
Putting on the Yukata

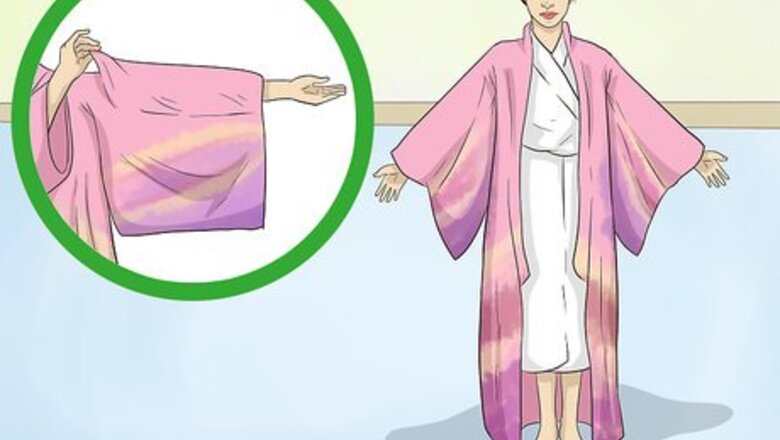
Slide your arms through the sleeves. Put on the yukata as you would a robe. It's a good idea to flip the long sleeves back over your arms. That way, they won't be in your way when you wrap the garment around your body.Tip: Typically, a yukata is worn over underwear alone, but you can wear a short sleeve shirt if you find it more comfortable.
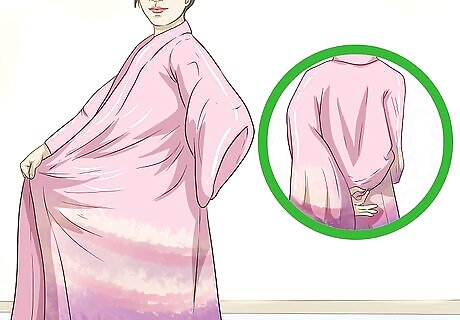
Find the back seam to center the garment. Hold both sides of the fabric together in front of your body with one hand. With the other hand, feel for the center seam on the back. Adjust the yukata so the seam is centered with your back and the sides are even.

Adjust the length to ankle level. Grasp the sides from the top corners and hold them straight in front of you. Then pull the yukata up until the bottom hem meets your ankles. Hold the hem at that height while you wrap the yukata around your body.
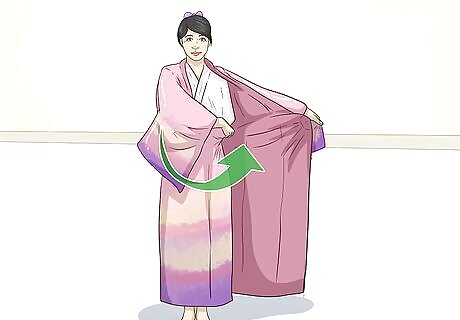
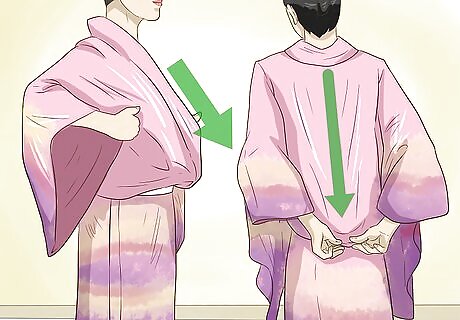
Bring the right side to your left hip. While holding the fabric in each hand, spread out your arms as if you were about to give a hug. Then pull the right side of the garment to your left hip bone, and hold it in place with your right hand.
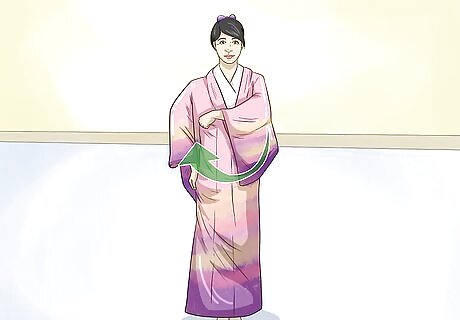
Cross the left side to your right hip. Pull the left side tightly so it holds the right side in place. Then slide out your right hand as you bring the left side to your right hip bone. Be sure to fold the right side down first, then wrap the left side over it. A yukata (or any other kimono) is only wrapped right side over left when dressing a deceased person for burial.
Securing the Garment

Tie a thin koshihimo band around your lower waist. Place the middle of a koshihimo across your belly just above your hip bones. Wrap the band around yourself and cross the ends behind your back. Then bring them to the front and tie a tight single knot. Koshihimo are thin bands that hold the fabric in place; typically, 2 are used to secure a yukata. Unlike the ornamental obi sash, koshihimo are hidden. One is tucked away under extra fabric, and the obi goes on top of the other.
Tuck extra fabric over the first koshihimo. Straighten out the collar and make sure the garment is tightly wrapped. Then fold extra fabric over the koshihimo to hide it. Be sure to tuck away the koshihimo in both the front and back.Tip: If you’re a woman, it’s fashionable to pull the back of the collar away from your neck. There should be enough space to fit your fist between the collar and the back of your neck. For men, the collar should fit tightly without exposing the back of the neck.

Tie a second koshihimo around your upper waist. Double check that the fold you made over the first koshihimo is straight and the yukata is snugly wrapped. To secure the top of the garment, tie another koshihimo just below your rib cage. The obi will cover this koshihimo, so there’s no need to fold fabric over it.
Tying the Obi

Fold about 16 in (41 cm) of an end in half lengthwise. Take an end of the long sash, and bring the corners together. Fold the end to make a narrow starting strip that’s half the width of the rest of the obi. The narrow end should be between 12 and 16 in (30 and 41 cm) long.

Wrap the obi around your waist twice. Drape the narrow starting end over your left shoulder so the end of the fold sits at your upper waistline. While holding the starting end in place, wrap the rest of the obi around your body twice in a clockwise direction. Pull the obi tightly as you wrap it around yourself.

Tie a bow for a feminine look. After wrapping the obi twice, pull the remaining length tightly across your front, and loop the starting end over and around it. Then fold the remaining length until you have a band of fabric that's about as wide as your waist. The waist-wide band of fabric will be your bow. Push the top and bottom of the band together so the sides stick out in a bow shape. Then loop the starting end tightly around the middle of the bow 2 to 3 times. To finish, tuck the starting band’s remaining length under the part of the obi that’s wrapped around your body.
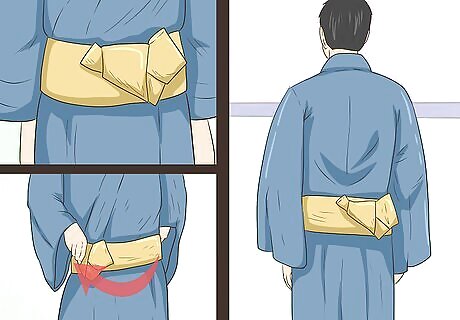
Make a clam’s mouth knot if you want a masculine look. After tightly wrapping the obi around your waist twice, fold the wider end so it’s the same length as the narrow starting end. Place the wider end over the narrow end, then loop it around the narrow end to make a basic single knot. After tying the knot, fold the wider end diagonally to the left, then lower it to make a loop. Insert the starting end through this loop, and pull both ends to make a tight knot.

Pull the knot to the side or to your back. Grasp the bow or knot with one hand and the back of the obi with the other. If you tied a bow, carefully rotate the obi so the bow is centered with your back. If you made a clam’s mouth knot, twist the obi so the knot is on the right side of your back.Tip: You’ll look more stylish if you tie a traditional knot, but you could always just tie a basic knot, especially if you’re just sleeping or relaxing in private. If tying a bow seems complicated, you could also wear an obi with a clip-on bow.


Comments
0 comment